Wednesday, 26 December 2012

Titles

Titles

Filming the titles compared to ‘Motion’

For my titles I wanted to experiment with alternative media, so instead of using computer based fonts and software to make the titles. I chose to create a piece where the titles are filmed being hand written on paper.
However I did use software such as Motion, which allows you to create titles using the software, I am familiar with how to use it, and can create titles using motion tweens or the templates available. I used the software three times, just to introduce the company logo and film title; as this looks more professional.        

I found that writing the titles was a quicker and a more efficient way of importing footage, into the timeline when editing.  In contrast to Motion, which if I used for all my titles will take more time; as it would be edited on a separate software and would need to be adjusted correctly: such as the; colours, tones, positioning, size, transparency and timings of the title etc, then saved and imported onto my Final Cut Pro ‘browser’. All this would need to done for each title, which would then be cut down and edited in Final Cut.
Where by filming the titles I did not have to adjust any settings, all my titles where imported with my footage, and could be easily selected and edited, then placed onto my timeline.

Filming the titles is not only an effective way to save time and be more organized when editing; but in addition draws more attention to them before as most people do not pay a lot of attention to the titles, but mainly the video and as the titles simultaneously fade in and out they become a side show to the main footage. However by filming the titles, this does not give the viewer any choice but to look at them, as they are a main part of the sequence which strings the footage together. I wanted my titles to stand out and not disappear behind the clips, and I feel by filming the titles I succeeded in drawing attention to them.


Timings and Number of Titles

I had to think carefully about the titles and how often they would appear and how many there would be.  So I began by doing some research and looking at the average amount of titles in a opening sequence, the average is between 10 -18, as most tiles last longer than 2 minutes which was our cut off time. I chose to film 10 titles, which for the time allocated was most suitable.

In all of my titles and footage I tried to make sure that they lasted for a certain amount of time. I made sure that the timings where between 0.03 and 0.05 for each clip.

1.      First title ‘Clear water productions’ was created in motion lasting for 0.04 seconds.
2.      Second was ‘Blue Vinyl Pictures ‘also made in Motion, lasting for 0.04 seconds.
3.      Third was ‘a clear snap shot…’ lasting for 0.05 filmed.
4.      Next was just footage lasting 0.05 seconds.
5.      A title ‘mark string pro..’ on screen for 0.05
6.      Film footage of items on screen for 0.05 seconds.
7.      After was a title ‘Sarah Jane’ on screen for 0.04 seconds.
8.      Next was a title which was rubbed out, lasting 0.05 seconds.
9.      Then some desk footage lasting 0.04 seconds.
10. Film of old memorabilia lasting 0.04 seconds.
11. Title ‘sound by kath….’ Lasting 0.0 5seconds.
12. Title ‘Colin Symons’ on screen for 0.05 seconds
13. Film footage of objects lasting 0.05 seconds.
14. Title’ Kevin Norman’ lasted 0.03 seconds.
15. Title ‘Martin Cooper’ on screen for 0.03 seconds.
16. Film footage of objects on screen 0.05 seconds.
17. Title ‘Maria Sutton’ 0.04 seconds.
18. Ripped page and Title of ‘Jason…’ 0.05 seconds.
19. Title ‘Casting by Fred…’ on screen for 0.03 seconds.
20. Motion title of film ‘Underestimated’ 0.04 seconds.

Sound used for Titles

The sound was a key element in making sure that my titles and the rest of the sequence flowed and I needed to make sure that I recorded each clip with a clear diagetic sound of pencil on paper. I did this in the edit by increasing the volume and sound levels of the clips and locking the video; so that it would over lap with the previous footage. The reason I’ve done this is that, the clips would look jumpy, and by using diagetic sound consistently through the footage, makes the sequence flow correctly.

Thursday, 20 December 2012

Edit: Main Print Screens


 Edit: Main Print Screens for Final Cut & Motion

This specific image is from 'google images'
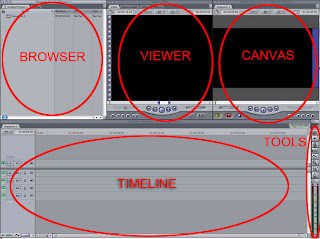
This is an outlook on how the software looks and what each part does.


I followed alternative media conventions in edit, as I challenged the preferred way of creating titles as: instead of constantly using title software like 'Motion', I had filmed my titles and was able to adjust settings using 'Final Cut'. 

The ‘Browser’ was used to display all my imported footage and titles, it can be edited such as renaming footage, it also includes video transition’ in ‘effects’, and a library to manipulate the video.

The ‘Viewer’ was used to edit and cut my footage before placing it onto my time line, also adding markers (in & out points), and adjusting the picture quality.

The ‘Canvas’ was used for me to view all my edited footage to see how it looks; it shows everything I’ve done so far, it was a essential for me to have it, as I could look at, what I had done and see what needed improving 


When editing I also looked back at some of previous work such as my timeline task, which supported me in being more cogent, in how I organized the timing of the tiles. I also implemented some of the knowledge I gained when, analysing my case studies such as in I discovered how the distributes are shown first, in my second case study that some of the credits have the speed adjusted and increased so that the credits appear at correct times which is what I have  implemented in my edit.


First I imported all my footage onto ‘Final Cut Pro’: a modern editing software. Once the footage was all on the viewer, I could organise the footage by re-naming it, this is useful because it would make my edit easier and more efficient.


Then I opened Motion, and went onto, ‘File’, ‘Open Template’, where there was a selection of templates on the software, once I’ve selected the template. This would be the only time I used motion, as all my titles had been filmed, which made editing more efficient and less complicated; as I had already chosen the style in how my titles would be displayed.   


 … I  edited the only software based titles I would be presenting in my title sequence; which where the production company names. I choose a similar style in which large production companies use, when being presented: simple yet classic. I used the selection tool and the text tool adjust the type, and then customised it 'library' where I can increase the size colour and shades... I then was able to import it into my time line.


Then I could start to focus on my footage, and begin to edit it. Previously I used basic editing software called 'i Movie' in the preliminary task, where we learnt basic techniques. Now i from using 'Final Cut Pro'  I have developed my knowledge in a more advanced software; which has allowed me think more like a producer, then a consumer, such as inputting marker heads, to cut down my footage. once i had edited my footage in the  I dragged it from the viewer, so that I can see it my time line.


All my footage has sound and I am able, to edit it by double clicking on it, then it is displayed in the viewer. So I can manipulate which sounds I want to mute and which sound I want to increase the volume of by inserting maker heads.
I have developed on this by talking about the timing of titles how they follow a repetitive beat and are in strict context with the music. The research into this sequence has challenged forms of my media product, which has caused me to consider aspects such as pacing of titles and timings, I then developed on this by completing a timeline task, without this I would struggle to form structured timings, in my end media product.


I could also import music, which I can drag down onto my time line then move into the correct position I want.
­­


I can also adjust speed by going on ‘modify’, then ‘speed’ and changing how fast or low I want to adjust the footage. This is a useful technique especially if you are not satisfied with how the footage flows. However the downside to adjusting speed is the fact it changes the quality of the footage.


I can also edit and manipulate the actual display of footage by adjusting the way it looks such as brightness, saturation, being able to sharpen it. This is a similar technique to how you would adjust an image in PhotoShop.

However I need to be careful as some of these video filters ruin how the video is displayed, however ‘image controls’ such as  ‘colour balance’  is an effective way to equalise the colour in the clip.


 In some of my footage I added transitions between clips; it is an   effective way to connect footage, which is slightly jumpy. You can import it by going on ‘effects’, ‘video transition’, ‘dissolve’ then a selection of transitions, I used ‘cross dissolve.’


There is also a tool used to connect clips called ‘link connection’ and ‘snapping tool’. The snapping tool allows you to connect footage together.


The time line is used to organise your footage, and presents the order it’s in it was effective in seeing how my title sequence flows together and if some footage needs cutting down.


I also needed to render my footage due to the fact, when footage is uploaded onto final cut, you are unable to view it in the ‘canvas’; it needs to be rendered because the footage  has be converted to a format which the edit software can manipulate, I rendered my footage as I went along as I found it easier.


This is the process: when I rendered. It should usually takes under a minute depending on the length of the footage.


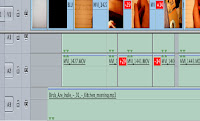
Also this warning came up on one of the viewer slugs, telling me that some footage is offline this means that when saving my footage on memory stitch and on the computer that some of it is not in the correct place, to solve this all I need to do is find where I saved the clip then import it and save it in write place.


My Opening Title Sequence


Final Opening Title Sequence

This my final filming piece for my opening title sequence for AS Media Studies


Story-Board and Planning Sheet

STORYBOARD AND PLANNING SHEET


First I had to plan what I was going to do, it is very important to plan, as it establishes how you will be working, for example without a plan you will miss shots, not have enough footage, the time you thought it would take to film,  will be unrealistic,  when you begin to edit you will realise that you need to film again or that you missed something out...


… for example working without a plan you will miss shots, not have enough footage, the time you thought it would take to film,  will be unrealistic,  when you begin to edit you will realise that you need to film again or that you missed something out...


… These are the reasons why I  planned as I then had a clear brief on what needed  to be achieved; and how long it will take me to achieve it. Not only is a plan a successful way to complete a filming assignment, it is also realistic, as in the filming industry planning is key in completing a filming project; not only does a plan correspond with each step you take in making the film: it also gave me a clear understanding of how I would edit;  as thinking and planning ahead is key in developing a well made piece,  showing that you are competent in doing so.


At first I found planning difficult but my tutor said that there are many sites such as ‘The Art of the Title Sequence’ and ‘OCR media studies.weebly.com’ by doing some research and looking at these sites and studying a lot of title sequences, I began to paint a clear picture in my mind of what I wanted to create and how I was going to do it.


The storey board you see is what I achieved from some of my planning. It was essential in helping me film my title sequence; as I used them frequently to check if I was on track, and so that it would all come together when I edit.
To conclude I am glad that I planned as it was an effective and practical way to direct my self; when it came to filming,  I was not obscure in my decisions, but focused.


Saturday, 1 December 2012

Location Recce Sheet


LOCATION RECCE SHEET


Activity at each Location.

Agreement & Requirements
Audio problems
Action taken to overcome each problem.

Music department sound and editing room. Activity in the room depends on times very quite little activity when I need to film


Music department- music and instrument room. little activity depending on times
Quiet no activity when I need to film.


There is no ambient lighting in this room only electric.
There is power for electrical equipment.
Clearance of paperwork and a few chairs is required.
And this has been agreements with Alan who manages and assigns times for people, to use the space and has given me access for 30 minutes of filming.
There is no agreement needed with the local council.


Again there is no ambient lighting in this room, as they want no noise what so ever.
They have plugs for electrical and music equipment.
There have been agreements made with the music department enabling me to use the space; however there can be people using it, so I have to be available at certain times.
Clearance such as wires and papers needed.
No agreement needed with local council.


There is no audio problem as the room it is sound proof; and the only way noise could be an issue, was if someone walked in the room un-expectedly


No issues with audio.


For the natural lighting problem there are electrical lights where you can control the brightness.
I was able to remove paperwork which was not needed and chairs.
The amount of time was not a issue as a I solved this by making sure I was organized.


The lighting is solved using eclectic lighting.

To solve the issue of timings, I need to be organised and look at my timetable to allocate certain times, so I can film.

I was able to clear wire and paperwork


Family office room, Tonbridge. Little activity in the room.


The lighting will be required however not natural lighting which needs to be covered.

The room will need to be reorganized, and a lot of thing will need to be cleared such as items in the desk, and in draws.

There is power available in the room for electrical equipment.

Access has been agreed to film in the room by a family member.


Sound problems such as noise from bellow the office.

No traffic noise or outside noise.

The lighting is solved using an office table, light. And diming ambient lighting using shutters.

There is permeation to use to room for the day and to reorganize for mise en scene as long it is placed back into its original order.

Sound will be solved by politely asking people to keep noise down.

Signed: Roxanne
Print Name: Roxanne Poynter
Date: 10.11.12