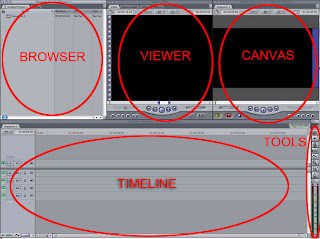
This specific image is from 'google images'  This is an outlook on how the software looks and what each part does.
I followed alternative media
conventions in edit, as I challenged the preferred way of
creating titles as: instead of constantly using title software like
'Motion', I had filmed my titles and was able to adjust settings using 'Final
Cut'.
The ‘Browser’ was used to display all my imported footage and titles, it can be edited such as renaming footage, it also includes video transition’ in ‘effects’, and a library to manipulate the video.
The ‘Viewer’ was used to edit and cut my footage before placing it onto my time line, also adding markers (in & out points), and adjusting the picture quality.
The ‘Canvas’ was used for me to view all my edited footage to see how it looks; it shows everything I’ve done so far, it was a essential for me to have it, as I could look at, what I had done and see what needed improving.
When editing I also looked back at some of previous work such as my timeline task, which supported me in being more cogent, in how I organized the
timing of the tiles. I
also implemented some of the knowledge I gained when, analysing my
case studies such as in I discovered how the distributes
are shown first, in my second case
study that some of the credits have the speed adjusted and
increased so that the credits appear at correct times which is what I have
implemented in my edit.
First I imported all my footage onto ‘Final Cut Pro’: a modern editing software. Once the footage was all on the viewer, I could organise the footage by re-naming it, this is useful because it would make my edit easier and more efficient.
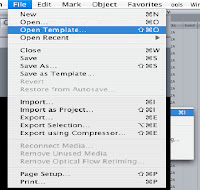
Then I opened Motion, and went onto, ‘File’, ‘Open Template’, where there was a selection of templates on the software, once I’ve selected the template. This would be the only time I used motion, as all my titles had been filmed, which made editing more efficient and less complicated; as I had already chosen the style in how my titles would be displayed.
Then I could start to focus on my footage, and begin to edit it. Previously I used basic editing software called 'i Movie' in the preliminary task, where we learnt basic techniques. Now i from using 'Final Cut Pro' I have developed my knowledge in a more advanced software; which has allowed me think more like a producer, then a consumer, such as inputting marker heads, to cut down my footage. once i had edited my footage in the I dragged it from the viewer, so that I can see it my time line.
All my footage has sound and I am able, to edit it by double clicking on it, then it is displayed in the viewer. So I can manipulate which sounds I want to mute and which sound I want to increase the volume of by inserting maker heads.
I have developed on this by talking about the timing of titles how they follow a repetitive beat and are in strict context with the music. The research into this sequence has challenged forms of my media product, which has caused me to consider aspects such as pacing of titles and timings, I then developed on this by completing a timeline task, without this I would struggle to form structured timings, in my end media product.
I could also import music, which I can drag down onto my time line then move into the correct position I want.
I can also adjust speed by going on ‘modify’, then ‘speed’ and changing how fast or low I want to adjust the footage. This is a useful technique especially if you are not satisfied with how the footage flows. However the downside to adjusting speed is the fact it changes the quality of the footage.
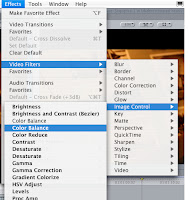
 I can also edit and manipulate the actual display of footage by adjusting the way it looks such as brightness, saturation, being able to sharpen it. This is a similar technique to how you would adjust an image in PhotoShop.
However I need to be careful as some of these video filters ruin how the video is displayed, however ‘image controls’ such as ‘colour balance’ is an effective way to equalise the colour in the clip.
There is also a tool used to connect clips called ‘link connection’ and ‘snapping tool’. The snapping tool allows you to connect footage together.
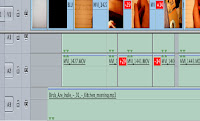
 The time line is used to organise your footage, and presents the order it’s in it was effective in seeing how my title sequence flows together and if some footage needs cutting down.
This is the process: when I rendered. It should usually takes under a minute depending on the length of the footage.
Also this warning came up on one of the viewer slugs, telling me that some footage is offline this means that when saving my footage on memory stitch and on the computer that some of it is not in the correct place, to solve this all I need to do is find where I saved the clip then import it and save it in write place.


